How To Make Honey Roasted Chickpeas: Your New Obsession For Crispy, Sweet & Salty Snacking (Oven & Air Fryer Magic)
The Ultimate Honey Roasted Chickpeas Recipe Crunchy, Sweet & Salty
Ingredients
Equipment
Method
- Dry the Chickpeas
- Rinse and drain canned chickpeas. Pat them dry thoroughly with a towel.
- Optional: Air-dry for 30–60 minutes and remove loose skins for extra crispiness.
- Coat & Bake
- Preheat oven to 375°F (190°C).
- Mix oil, cinnamon, and sugar, then toss with chickpeas until coated.
- Spread in a single layer on parchment-lined baking sheet. Bake for 35–45 minutes, stirring occasionally.
- Add Honey & Finish
- Drizzle honey over baked chickpeas, toss to coat, and return to oven for 5–10 minutes.
- Turn off oven, leave chickpeas inside to cool completely (this locks in crunch!).
- Prep & Cook
- Toss chickpeas with oil, salt, honey, and cinnamon.
- Air fry at 380°F (190°C) for 12–17 minutes, shaking the basket every 5 minutes.
- Let cool for 5–10 minutes before enjoying.
- Pro Tips for Perfect Crunch
- Dry them well : Moisture is the enemy of crispiness!
- Don’t overcrowd : Use a single layer for even roasting.
- Cool down : Letting them cool in the oven ensures maximum crunch.
- Adjust sweetness : Add more honey or sugar for extra caramelization.
Notes
Nutrient-packed : High in plant-based protein, fiber, and heart-healthy fats.
Allergy-friendly : Safe for nut-free households.
Two cooking methods : Oven or air fryer – your choice!
Customizable : Sweet, spicy, or savory variations included.
Recipe Variations
Vegan : Swap honey for maple syrup.
Sweet & Spicy : Add cayenne or chili powder.
Savory Twist : Try za’atar, Old Bay, or garlic powder.
Extra Salty : Finish with flaky sea salt.
Storage & Shelf Life
Store cooled chickpeas in an airtight container at room temperature.
Best eaten within 3–5 days (they’ll soften slightly over time).
No fridge! Moisture ruins crispiness.
Table of Contents
Forget Boring Snacks: These Honey Roasted Chickpeas Are Your New Addiction
Let’s be real, we all have that moment. It’s 3 PM, your energy is tanking, and the siren song of sugary snacks is calling your name. Or maybe it’s movie night, and the usual buttery popcorn just isn’t cutting it. What if I told you there’s a snack that’s crunchy, sweet, salty, and so addictive you’ll be making it on repeat? And the best part? It’s ridiculously easy to make. Welcome to the wonderful world of honey roasted chickpeas.
Think of them as a healthier, cooler cousin to those candied nuts you see around the holidays. They’re the perfect solution when you’re craving something sweet but want to keep it on the healthier side. Plus, for anyone with a nut allergy, these little guys are a game-changer, delivering that same satisfying crunch without the worry.
Get ready, because this guide is your ticket to the crispiest, most delicious honey roasted chickpeas you’ve ever had. We’re talking a handful of simple ingredients and methods for both your trusty oven and your beloved air fryer. These little golden nuggets are perfect for holiday munching, thoughtful homemade gifts, or just elevating your everyday snacking game.
Why Honey Roasted Chickpeas?
So, what’s all the buzz about? Let’s break down why these crispy little legumes deserve a prime spot in your snack rotation.
A Delicious & Healthy Snack Choice
Don’t let their candy-like taste fool you; these chickpeas are packing some serious nutritional power.
- Nutrient-Packed: Chickpeas, or garbanzo beans, are a fantastic source of plant-based protein and fiber. This power combo helps to keep you feeling full and satisfied, providing a steady stream of energy without the dreaded sugar crash.
- Heart-Healthy Fats: We’re using good-for-you oils like avocado or canola oil, which are rich in monounsaturated fats. These fats are your heart’s best friend, helping to support healthy blood flow.
- The Goodness of Honey: Honey isn’t just a pretty face in the world of sweeteners. It’s a more natural alternative to white sugar and contains a host of vitamins, minerals, antioxidants, and even prebiotics to support a happy gut.
- Cinnamon’s Superpowers: That warm, comforting spice does more than just taste amazing. Cinnamon adds a burst of flavor without any extra sugar or salt and is loaded with phytochemicals that can give your metabolism a little boost.
- Dietary Friendly: These beauties are naturally vegetarian, dairy-free, and can easily be made gluten-free (just double-check your spices!). They are also a fantastic and safe snack for kids’ lunchboxes.
A Fantastic Nut-Free Alternative
If you or someone you love has a nut allergy, you know the struggle of finding satisfying, crunchy snacks. These sweet and salty chickpeas have a flavor and texture that’s incredibly similar to cinnamon-roasted almonds, making them the perfect stand-in.
Easy to Make & Versatile
Honestly, the hardest part of this recipe is waiting for them to cool down! With minimal prep time and just a few pantry staples, you can whip up a batch of these crispy chickpea snacks in no time. And the best part? They’re a blank canvas for your culinary creativity – go sweet, go savory, the choice is yours!
Key Ingredients You’ll Need
You probably have most of what you need already!
 1")
The Chickpeas (Garbanzo Beans)
- Canned vs. Dried: For ultimate ease, a 15-ounce can of chickpeas is the way to go. This will give you about 1.5 cups of beans. If you’re a fan of using dried chickpeas, just make sure they’re fully cooked before you start.
- The Prep is Key: This is non-negotiable! You must rinse the chickpeas under cold water until the water runs clear and then drain them really well.
The Supporting Cast
- Oil: I love canola or avocado oil for their neutral taste, but olive oil can also work if you don’t mind a slightly more savory note.
- Sweetener: Honey is the star of our show! For a vegan version, maple syrup or agave nectar are fantastic substitutes.
- Spices: Ground cinnamon is essential for that classic, cozy flavor. A little granulated sugar also helps with the caramelization.
- Salt: A pinch of kosher or fine sea salt is crucial to balance the sweetness and make all the flavors pop.
Step-by-Step Instructions: Achieve Perfect Crunch
Ready for the magic? Here’s how to get those perfectly crispy chickpeas every single time.
Video Via YouTube / by “How to Cook to Cope“
Crucial First Step: Drying the Chickpeas!
I can’t say this enough: MOISTURE IS THE ENEMY OF CRISPINESS!
- Pat Them Dry: Once rinsed and drained, spread the chickpeas on a layer of paper towels or a clean, lint-free kitchen towel and pat them until they are as dry as you can possibly get them.
- Air Dry for the Win: If you have the time, letting them air dry on the counter for 30 minutes to an hour after patting them is the secret to an extra-shatteringly crisp texture.
- To Peel or Not to Peel? (Optional but Recommended): As you’re drying them, gently rub the chickpeas with the towel. You’ll notice many of the thin skins will start to peel off. Getting rid of these helps prevent them from burning and allows the chickpea itself to get even crispier. Don’t stress about getting every single one, though!
A. Oven Method
 2")
Yields: Approx. 2-3 cups
Ingredients:
- 1 can (15 oz) chickpeas, rinsed and thoroughly dried
- 2 tsp canola oil
- 1 tsp ground cinnamon
- 1 tbsp granulated sugar
- 1 tbsp honey
Instructions:
- Preheat Oven: Get your oven preheating to 375°F (190°C). Line a large baking sheet with parchment paper – you’ll thank me later when it’s time to clean up.
- Initial Coating: In a small bowl, whisk together the oil, cinnamon, and sugar. Add your super-dry chickpeas and toss until every single one is coated.
- First Bake: Spread the chickpeas in a single, even layer on your prepared baking sheet. Bake for 35-45 minutes, giving them a good stir every 10-15 minutes. They should be a deep golden brown and feel crunchy to the touch.
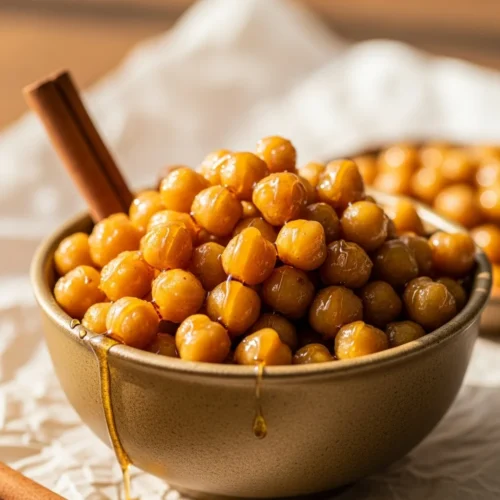
- Honey Drizzle: Pull the hot chickpeas out of the oven. In a separate bowl, have your honey ready. Dump the hot chickpeas in and toss them quickly to get a nice, even coating.
- Final Bake & Cool Down: Spread the honey-coated chickpeas back onto the baking sheet. Pop them back in the oven for another 5-10 minutes. Now for the most important part: turn the oven off, crack the door open, and let the chickpeas cool completely inside the oven. This final step is the ultimate secret to achieving maximum crunch!
B. Air Fryer Method
 3")
Yields: Approx. 1 can
Ingredients:
- 1 can (15 oz) chickpeas, rinsed and thoroughly dried
- 2 tbsp olive oil
- ½ tsp salt
- 3 tbsp honey
- ½ tsp cinnamon
Instructions:
- Preheat Air Fryer: Set your air fryer to 380°F (190°C).
- Coat the Chickpeas: In a bowl, mix together the olive oil, salt, honey, and cinnamon. Add your dry chickpeas and give them a good toss.
- Air Fry: Place the seasoned chickpeas in the air fryer basket in a single layer.
- Cook & Shake: Cook for about 12-17 minutes, shaking the basket every 5-7 minutes to ensure they cook evenly. They’re done when they’re golden and crispy to your liking.
- Serve: Enjoy them warm or at room temperature!
Expert Tips for Ultimate Crispiness & Avoiding Common Issues
 4")
- Dry, Dry, Dry: Have I mentioned this enough? It’s the golden rule of crispy chickpeas.
- Give Them Space: Don’t overcrowd the pan or basket! A single layer is a must for even roasting.
- Watch Like a Hawk: Ovens can be quirky. Keep an eye on your chickpeas near the end of the baking time to prevent any accidental burning.
- The Oven Cooldown is Key: Seriously, don’t skip this step if you’re using the oven method. It makes a world of difference.
- Stir it Up: An occasional stir (or shake in the air fryer) is your best bet for all-over crispiness.
- Patience is a Virtue: If they’re still a bit soft, give them another 5 minutes. They will continue to crisp up as they cool.
Serving Suggestions & Pairing Ideas
 5")
- Straight Up: By the handful is my favorite way to enjoy them.
- Salad Bling: Move over, croutons! These add a sweet and savory crunch that’s unbeatable.
- Ice Cream Topper: Trust me on this one. It’s a game-changer.
- Balanced Snack Attack: Pair them with some fresh fruit or veggie sticks for a well-rounded snack.
- Kid-Approved: They’re a fantastic nut-free option for school lunches.
Delicious Variations to Try
Once you’ve mastered the classic, why not get creative?
- Vegan Honey Roasted Chickpeas: Simply swap the honey for maple syrup or agave nectar.
- Sweet & Spicy: Add a pinch of cayenne or chili powder to the mix for a little kick.
- Savory Twists: Ditch the sweet stuff and toss with your favorite savory seasonings like Za’atar, Old Bay, or even ranch seasoning powder.
- Pure Honey Flavor: Love that honey taste? Just leave out the cinnamon.
- A Touch More Salt: A little sprinkle of flaky sea salt after they come out of the oven is divine.
Storage Recommendations
 6")
- Best Eaten Fresh: For peak crispiness, enjoy them the day they’re made.
- Airtight is Right: Store completely cooled chickpeas in an airtight container at room temperature.
- No Fridge Zone: Whatever you do, don’t put them in the refrigerator! The moisture will make them soft and chewy.
- Shelf Life: They’ll last for up to a week, but they will slowly lose some of their crunch over time.
Related Posts
Love this recipe? Try these next:
 7")
- Chicken and Potato Soup: 7 Ways to Make the Ultimate Comfort Bowl
- How To Make Chicken Florentine Soup In 3 Simple Steps
- One Pot Pasta – Quick & Creamy in 30 Minutes – A savory dinner option.
- Apple Slices With Peanut Butter & Granola: How To Make In 3 Steps
Frequently Asked Questions (FAQs)
Q: Are these truly vegan?
A: Not with honey, no. But it’s an easy swap! Use maple syrup or agave nectar to make them 100% vegan-friendly.
Q: Do I really have to peel the skins off?
A: It’s optional, but I highly recommend it for the crispiest result and to stop the loose skins from burning.
Q: Can I use dried chickpeas?
A: Absolutely! Just make sure they are fully cooked first. You’ll need about 1.5 cups of cooked chickpeas to equal one 15-ounce can.
Q: How long do they stay crunchy?
A: They are at their absolute crunchiest on day one. Stored properly, they’ll be good for about a week, but the crunch factor will diminish over time.
Q: Help! Mine were burnt or still chewy.
A: This is a classic rookie mistake, and it’s almost always due to one of three things: not drying the chickpeas enough, overcrowding the pan, or a wonky oven temperature. Make sure they’re bone dry, give them space, and let them cool down in the turned-off oven!
You’ve Got This!
See? Making incredibly delicious and healthy honey roasted chickpeas is a breeze. They’re the perfect, versatile snack that’s sure to become a new favorite. So go ahead, give this recipe a try and feel free to get creative with the flavors!
We Want to See Your Creations!
If you make these sweet and salty chickpeas, let us know how they turned out! Rate the recipe below, leave a comment with your experience, and don’t forget to snap a photo and share it on social media. Tag us and use the hashtags #HoneyRoastedChickpeas and #CrispyChickpeaSnacks so we can see your masterpiece!